Looking for Something?
| Word Tips |
| Excel Tips |
| Outlook Tips |
| PowerPoint Tips |
| Windows Tips |
| Hardware Tips |
| Internet Tips |


Pick a Tip:
| < prev | next > | |||
|---|---|---|---|---|
| 1 | 2 | 3 | 4 | 5 |
| 6 | 7 | 8 | 9 | 10 |
| 11 | 12 | 13 | 14 | 15 |
| 16 | 17 | 18 | 19 | 20 |
| 21 | 22 | 23 | 24 | 25 |
| 26 | 27 | 28 | 29 | 30 |
| 31 | 32 | 33 | 34 | 35 |
| 36 | 37 | 38 | 39 | 40 |
| 41 | 42 | 43 | 44 | 45 |
| 46 | 47 | 48 | 49 | 50 |
| 51 | 52 | 53 | 54 | 55 |
| 56 | 57 | 58 | 59 | 60 |
| 61 | 62 | 63 | 64 | 65 |
| 66 | 67 | 68 | 69 | 70 |
| 71 | 72 | 73 | 74 | 75 |
| 76 | 77 | 78 | 79 | 80 |
| 81 | 82 | 83 | 84 | 85 |
| 86 | 87 | 88 | 89 | 90 |
| 91 | 92 | 93 | 94 | 95 |
| 96 | 97 | 98 | 99 | 100 |
| 101 | 102 | 103 | 104 | 105 |
| 106 | 107 | 108 | 109 | 110 |
| 111 | 112 | 113 | 114 | 115 |
| 116 | 117 | 118 | 119 | 120 |
| 121 | 122 | 123 | 124 | 125 |
| 126 | 127 | 128 | 129 | 130 |
| 131 | 132 | 133 | 134 | 135 |
| 136 | 137 | 138 | 139 | 140 |
| 141 | 142 | 143 | 144 | 145 |
| 146 | 147 | 148 | 149 | 150 |
| 151 | 152 | 153 | 154 | 155 |
| 156 | 157 | 158 | 159 | 160 |
| 161 | 162 | 163 | 164 | 165 |
| 166 | 167 | 168 | 169 | 170 |
| 171 | 172 | 173 | 174 | 175 |
| 176 | 177 | 178 | 179 | 180 |


Technology Tip Number 51
|
||||||
|---|---|---|---|---|---|---|
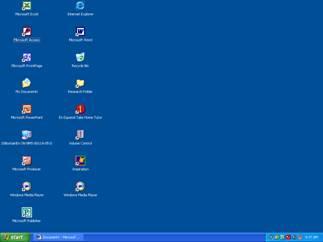
Today’s Technology Tip will help you navigate your way through the various folders and windows on your Microsoft desktop. Some common terminology you should be familiar with:
Shortcut to Word:
The “My Computer” Icon:
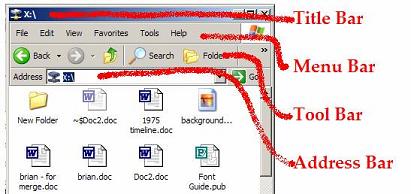
You might notice that your icons and folders might look different than the ones pictured above. When ever you open a folder (by double clicking the left mouse button) a new window opens to show you what is in that folder. You can change how the icons (files) are displayed. Here’s how: 1) Open a folder, any folder. 2) Every window has the following “Bars” at the top:
The Title Bar tells you the name of the folder you are in. In this example the title bar tells you that you are in a network drive called "X:" Each word on the Menu Bar gives you a drop down menu of options. The Tool Bar offers you shortcuts for common tasks The Address Bar tells you which folder you are in and also offers you a way to access other folders. If you click the triangle on the Address Bar you can see a drop down list of other folders and pathways to them:
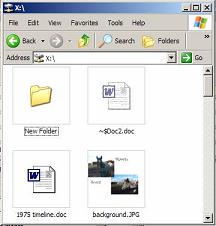
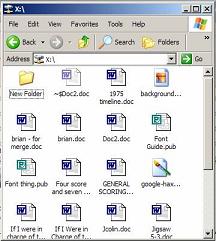
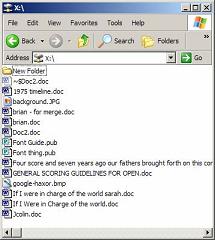
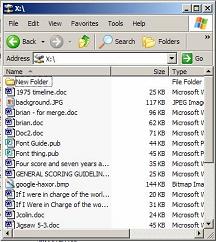
3) To change the view click on the word “View” on the menu bar and select a new view from that list. Each view has its own advantages and disadvantages. For example, if you are looking at a folder full of pictures you might want to use the “Thumbnail” view so you can see what each picture looks like. If you are trying to clean out your C: drive you might want to use the “Details” view to find the largest files so you can delete them first. Here are some sample views of the same folder:
|
||||||
PRACTICE ACTIVITY: Open up a folder on your computer today and try changing the view. Select a new one that you like. TO KEEP ON LEARNING: If you'd like to learn some more about the desktop in Microsoft Windows try searching the internet for: Microsoft Windows History
|
||||||
Looking for Something? |
||||||